Don't forget to enter to win the $60 gift card to Cowgirl Heaven!
Come link up every Saturday for Sew Crafty Saturday!
~~~~~~~~~~~~~~~~~~~~~~~~~~~~~~~~~~~~~~~~~~~~~~~~~~~~

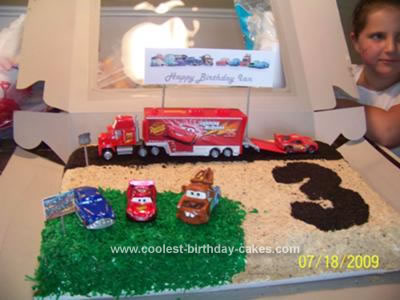
I made this cake about a year and a half ago for Ian's 3rd birthday. Since I haven't been able to post to many crafty things lately, I figured I'd share this with ya'll. It is sooo good. My family still asks me to make this cake even if it is 20 degrees out!
I got most of the decorating ideas on Coolest Homemade Cakes. And I submitted it to the site after Ian's party. You can find my cake here. Here's how I made it. Let me know if you have any questions. I think I stored my exact recipe somewhere when I made this year's cake.
Go check it out they have some really amazing ideas!
"First, I baked a chocolate cake in a Wilton 12" x 18" cake pan then put it in the freezer, while my ice cream softened in the fridge, for 30 minutes. I then spread, in all, two half gallon cartons of vanilla ice cream on top of the cake and put it back in the freezer to harden. In the meantime, I mixed together whipped cream, a box of chocolate pudding, hot fudge topping and oreo cookies. I had found this recipe online but I don't remember where. I think it was called oreo fudge ice cream cake. I adapted it to my needs.
I then iced the cake with this whipped cream mixture and let it harden. I used crushed up vanilla wafers for the sand effect, with a few chocolate teddy grahams thrown in, to give it some color variation and make it look like genuine sand.
I printed a giant '3', cut it out and laminated it, using it as a stencil for the number on the cake. A strip of cardstock was used as a stencil for the road. Once the cake was covered with its sand-like coating, I removed the stencils and used crushed oreos to fill in the road and the number '3'. I dyed the grated coconut green and filled in the blank corner.
I then printed signs on cardstock off the computer and used my son's toy cars to decorate. He loved it and I had a great time doing it. The frozen coconut was a surprise hit with the kids. They loved it. One tip: if you freeze the cake overnight, take it out 20-30 minutes before you plan to cut it. We didn't take it out earlier, thinking it would quickly melt in the 100 degrees outside temperature, but, even with the heat, it was a good 30 minutes before we could cut through it, even with a hot knife. Once we did, though it was delicious!"♥
Linked to: Tatertots & Jello; CraftOManiac; Keeping It Simple; Me Making Do; Mad in Crafts; Texas Monkey; Sumo's Sweet Stuff; Making the World Cuter;
Linked to: Tatertots & Jello; CraftOManiac; Keeping It Simple; Me Making Do; Mad in Crafts; Texas Monkey; Sumo's Sweet Stuff; Making the World Cuter;


2 comments:
That Cake is awesome. Love the whole Cars theme.
It turned out amazing!I know my nephew would just die over this cake! And thanks for stopping by the RLM....I was able to jump in on your linky party :)
Post a Comment
Thanks for stopping by! I love hearing from you. I read and apprieciate each of your comments. Please make sure your email is enabled so that I can respond to your comments. ♥